Topics in Part 3
- React to selection changes in the table.
- Add functionality to the add, edit, and remove buttons.
- Create a custom popup dialog to edit a person.
- Validate user input.
React to Table Selections
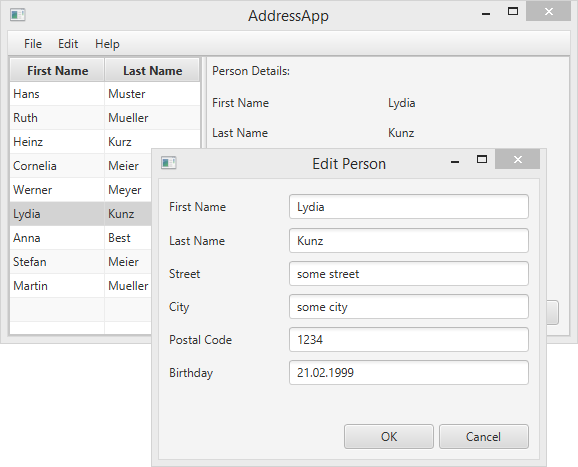
Obviously, we haven’t used the right side of our application, yet. The idea is to display the details about a person on the right side when the user selects a person in the table.
First, let’s add a new method inside PersonOverviewController that helps us fill the labels with the data from a single Person.
Create a method called showPersonDetails(Person person). Go trough all the labels and set the text using setText(...) with details from the person. If null is passed as parameter, all labels should be cleared.
PersonOverviewController.java
/**
 * Fills all text fields to show details about the person.
 * If the specified person is null, all text fields are cleared.
 *
 * @param person the person or null
 */
private void showPersonDetails(Person person) {
    if (person != null) {
        // Fill the labels with info from the person object.
        firstNameLabel.setText(person.getFirstName());
        lastNameLabel.setText(person.getLastName());
        streetLabel.setText(person.getStreet());
        postalCodeLabel.setText(Integer.toString(person.getPostalCode()));
        cityLabel.setText(person.getCity());

        // TODO: We need a way to convert the birthday into a String!
        // birthdayLabel.setText(...);
    } else {
        // Person is null, remove all the text.
        firstNameLabel.setText("");
        lastNameLabel.setText("");
        streetLabel.setText("");
        postalCodeLabel.setText("");
        cityLabel.setText("");
        birthdayLabel.setText("");
    }
}
Convert the Birthday Date to a String
You will notice that we couldn’t set the birthday into the Label because it is of type LocalDate and not a String. We need to format the date first.
We will use the conversion from LocalDate and String and vice versa in several places. It’s good practice to create a helper class with static methods for this. We’ll call it DateUtil and place it in a seperate package called ch.makery.address.util:
DateUtil.java
package ch.makery.address.util;

import java.time.LocalDate;
import java.time.format.DateTimeFormatter;
import java.time.format.DateTimeParseException;

/**
 * Helper functions for handling dates.
 *
 * @author Marco Jakob
 */
public class DateUtil {

	/** The date pattern that is used for conversion. Change as you wish. */
	private static final String DATE_PATTERN = "dd.MM.yyyy";

	/** The date formatter. */
	private static final DateTimeFormatter DATE_FORMATTER =
			DateTimeFormatter.ofPattern(DATE_PATTERN);

	/**
     * Returns the given date as a well formatted String. The above defined
     * {@link DateUtil#DATE_PATTERN} is used.
     *
     * @param date the date to be returned as a string
     * @return formatted string
     */
    public static String format(LocalDate date) {
        if (date == null) {
            return null;
        }
        return DATE_FORMATTER.format(date);
    }

    /**
     * Converts a String in the format of the defined {@link DateUtil#DATE_PATTERN}
     * to a {@link LocalDate} object.
     *
     * Returns null if the String could not be converted.
     *
     * @param dateString the date as String
     * @return the date object or null if it could not be converted
     */
    public static LocalDate parse(String dateString) {
        try {
        	return DATE_FORMATTER.parse(dateString, LocalDate::from);
        } catch (DateTimeParseException e) {
            return null;
        }
    }

    /**
     * Checks the String whether it is a valid date.
     *
     * @param dateString
     * @return true if the String is a valid date
     */
    public static boolean validDate(String dateString) {
    	// Try to parse the String.
    	return DateUtil.parse(dateString) != null;
    }
}
DATE_PATTERN. For all possible formats see DateTimeFormatter.
Use the DateUtil
Now we need to use our new DateUtil in the showPersonDetails method of PersonOverviewController. Replace the TODO we added with the following line:
birthdayLabel.setText(DateUtil.format(person.getBirthday()));
Listen for Table Selection Changes
To get informed when the user selects a person in the person table, we need to listen for changes.
There is an interface in JavaFX called ChangeListener with one method called changed(...). The method has three parameters: observable, oldValue, and newValue.
We will create such a ChangeListener using a Java 8 lambda expression. Let’s add a few lines to the initialize() method in PersonOverviewController. Now it looks like this:
PersonOverviewController.java
@FXML
private void initialize() {
    // Initialize the person table with the two columns.
    firstNameColumn.setCellValueFactory(
            cellData -> cellData.getValue().firstNameProperty());
    lastNameColumn.setCellValueFactory(
            cellData -> cellData.getValue().lastNameProperty());

    // Clear person details.
    showPersonDetails(null);

    // Listen for selection changes and show the person details when changed.
    personTable.getSelectionModel().selectedItemProperty().addListener(
            (observable, oldValue, newValue) -> showPersonDetails(newValue));
}
With showPersonDetails(null); we reset the person details.
With personTable.getSelectionModel... we get the selectedItemProperty of the person table and add a listener to it. Whenever the user selects a person in the table, our lambda expression is executed. We take the newly selected person and pass it to the showPersonDetails(...) method.
Try to run your application at this point. Verify that when you select a person in the table, details about that person are displayed on the right.
If something doesn’t work, you can compare your PersonOverviewController class with PersonOverviewController.java.
The Delete Button
Our user interface already contains a delete button but without any functionality. We can select the action for a button inside the Scene Builder. Any method inside our controller that is annotated with @FXML (or is public) is accessible by the Scene Builder. Thus, let’s first add a delete method at the end of our PersonOverviewController class:
PersonOverviewController.java
/**
 * Called when the user clicks on the delete button.
 */
@FXML
private void handleDeletePerson() {
    int selectedIndex = personTable.getSelectionModel().getSelectedIndex();
    personTable.getItems().remove(selectedIndex);
}
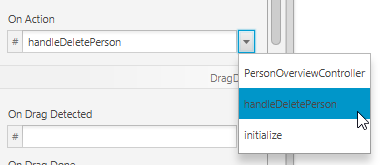
Now, open the PersonOverview.fxml file in SceneBuilder. Select the Delete button, open the Code group and choose handleDeletePerson in the dropdown of On Action.
Error Handling
If you run the application at this point you should be able to delete selected persons from the table. But what happenes if you click the delete button while no person is selected in the table?
There will be an ArrayIndexOutOfBoundsException because it could not remove a person item at index -1. The index -1 was returned by getSelectedIndex() - which means that there was no selection.
To ignore such an error is not very nice, of course. We should let the user know that he/she must select a person before deleting. (Even better would be if we disabled the button so that the user doesn’t even have the chance to do something wrong.)
With some changes made to the handleDeletePerson() method, we can show a simple popup dialog whenever the user pushes the delete button while no person is selected in the table:
PersonOverviewController.java
/**
 * Called when the user clicks on the delete button.
 */
@FXML
private void handleDeletePerson() {
    int selectedIndex = personTable.getSelectionModel().getSelectedIndex();
    if (selectedIndex >= 0) {
        personTable.getItems().remove(selectedIndex);
    } else {
        // Nothing selected.
        Alert alert = new Alert(AlertType.WARNING);
        alert.initOwner(mainApp.getPrimaryStage());
        alert.setTitle("No Selection");
        alert.setHeaderText("No Person Selected");
        alert.setContentText("Please select a person in the table.");

        alert.showAndWait();
    }
}
The New and Edit Dialogs
The new and edit actions are a bit more work: We’ll need a custom dialog (that means a new stage) with a form to ask the user for details about the person.
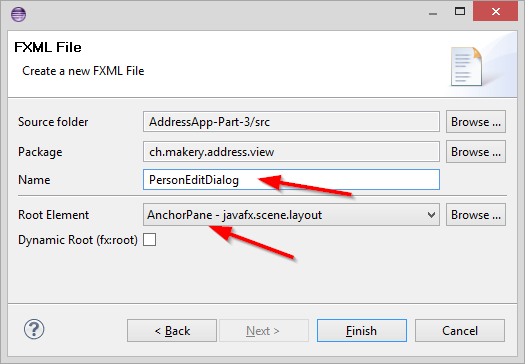
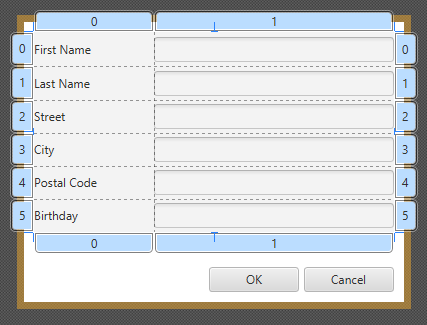
Design the Dialog
-
Create a new fxml file called
PersonEditDialog.fxmlinside the view package.
-
Use a
GridPane,Labels,TextFields andButtons to create a Dialog like the following:
Create the Controller
Create the controller for the Dialog as PersonEditDialogController.java:
PersonEditDialogController.java
package ch.makery.address.view;

import javafx.fxml.FXML;
import javafx.scene.control.Alert;
import javafx.scene.control.Alert.AlertType;
import javafx.scene.control.TextField;
import javafx.stage.Stage;
import ch.makery.address.model.Person;
import ch.makery.address.util.DateUtil;

/**
 * Dialog to edit details of a person.
 *
 * @author Marco Jakob
 */
public class PersonEditDialogController {

    @FXML
    private TextField firstNameField;
    @FXML
    private TextField lastNameField;
    @FXML
    private TextField streetField;
    @FXML
    private TextField postalCodeField;
    @FXML
    private TextField cityField;
    @FXML
    private TextField birthdayField;


    private Stage dialogStage;
    private Person person;
    private boolean okClicked = false;

    /**
     * Initializes the controller class. This method is automatically called
     * after the fxml file has been loaded.
     */
    @FXML
    private void initialize() {
    }

    /**
     * Sets the stage of this dialog.
     *
     * @param dialogStage
     */
    public void setDialogStage(Stage dialogStage) {
        this.dialogStage = dialogStage;
    }

    /**
     * Sets the person to be edited in the dialog.
     *
     * @param person
     */
    public void setPerson(Person person) {
        this.person = person;

        firstNameField.setText(person.getFirstName());
        lastNameField.setText(person.getLastName());
        streetField.setText(person.getStreet());
        postalCodeField.setText(Integer.toString(person.getPostalCode()));
        cityField.setText(person.getCity());
        birthdayField.setText(DateUtil.format(person.getBirthday()));
        birthdayField.setPromptText("dd.mm.yyyy");
    }

    /**
     * Returns true if the user clicked OK, false otherwise.
     *
     * @return
     */
    public boolean isOkClicked() {
        return okClicked;
    }

    /**
     * Called when the user clicks ok.
     */
    @FXML
    private void handleOk() {
        if (isInputValid()) {
            person.setFirstName(firstNameField.getText());
            person.setLastName(lastNameField.getText());
            person.setStreet(streetField.getText());
            person.setPostalCode(Integer.parseInt(postalCodeField.getText()));
            person.setCity(cityField.getText());
            person.setBirthday(DateUtil.parse(birthdayField.getText()));

            okClicked = true;
            dialogStage.close();
        }
    }

    /**
     * Called when the user clicks cancel.
     */
    @FXML
    private void handleCancel() {
        dialogStage.close();
    }

    /**
     * Validates the user input in the text fields.
     *
     * @return true if the input is valid
     */
    private boolean isInputValid() {
        String errorMessage = "";

        if (firstNameField.getText() == null || firstNameField.getText().length() == 0) {
            errorMessage += "No valid first name!\n";
        }
        if (lastNameField.getText() == null || lastNameField.getText().length() == 0) {
            errorMessage += "No valid last name!\n";
        }
        if (streetField.getText() == null || streetField.getText().length() == 0) {
            errorMessage += "No valid street!\n";
        }

        if (postalCodeField.getText() == null || postalCodeField.getText().length() == 0) {
            errorMessage += "No valid postal code!\n";
        } else {
            // try to parse the postal code into an int.
            try {
                Integer.parseInt(postalCodeField.getText());
            } catch (NumberFormatException e) {
                errorMessage += "No valid postal code (must be an integer)!\n";
            }
        }

        if (cityField.getText() == null || cityField.getText().length() == 0) {
            errorMessage += "No valid city!\n";
        }

        if (birthdayField.getText() == null || birthdayField.getText().length() == 0) {
            errorMessage += "No valid birthday!\n";
        } else {
            if (!DateUtil.validDate(birthdayField.getText())) {
                errorMessage += "No valid birthday. Use the format dd.mm.yyyy!\n";
            }
        }

        if (errorMessage.length() == 0) {
            return true;
        } else {
            // Show the error message.
            Alert alert = new Alert(AlertType.ERROR);
            alert.initOwner(dialogStage);
            alert.setTitle("Invalid Fields");
            alert.setHeaderText("Please correct invalid fields");
            alert.setContentText(errorMessage);

            alert.showAndWait();

            return false;
        }
    }
}
A few things to note about this controller:
- The
setPerson(...)method can be called from another class to set the person that is to be edited. - When the user clicks the OK butten, the
handleOk()method is called. First, some validation is done by calling theisInputValid()method. Only if validation was successful, the person object is filled with the data that the user entered. Those changes will directly be applied to the person object that was passed tosetPerson(...)! - The boolean
okClickedis used so that the caller can determine whether the user clicked the OK or Cancel button.
Link View and Controller
With the View (FXML) and the controller created we need to link them together:
- Open the
PersonEditDialog.fxml. - In the Controller group on the left side select the
PersonEditDialogControlleras controller class. - Set the fx:id of all
TextFields to the corresponding field of the controller. - Set the onAction of the two buttons to the corresponding handler method.
Opening the Dialog
Add a method to load and display the edit person dialog inside our MainApp:
MainApp.java
/**
 * Opens a dialog to edit details for the specified person. If the user
 * clicks OK, the changes are saved into the provided person object and true
 * is returned.
 *
 * @param person the person object to be edited
 * @return true if the user clicked OK, false otherwise.
 */
public boolean showPersonEditDialog(Person person) {
    try {
        // Load the fxml file and create a new stage for the popup dialog.
        FXMLLoader loader = new FXMLLoader();
        loader.setLocation(MainApp.class.getResource("view/PersonEditDialog.fxml"));
        AnchorPane page = (AnchorPane) loader.load();

        // Create the dialog Stage.
        Stage dialogStage = new Stage();
        dialogStage.setTitle("Edit Person");
        dialogStage.initModality(Modality.WINDOW_MODAL);
        dialogStage.initOwner(primaryStage);
        Scene scene = new Scene(page);
        dialogStage.setScene(scene);

        // Set the person into the controller.
        PersonEditDialogController controller = loader.getController();
        controller.setDialogStage(dialogStage);
        controller.setPerson(person);

        // Show the dialog and wait until the user closes it
        dialogStage.showAndWait();

        return controller.isOkClicked();
    } catch (IOException e) {
        e.printStackTrace();
        return false;
    }
}
Add the following methods to the PersonOverviewController. Those methods will call the showPersonEditDialog(...) from the MainApp when the user clicks the new or edit button.
PersonOverviewController.java
/**
 * Called when the user clicks the new button. Opens a dialog to edit
 * details for a new person.
 */
@FXML
private void handleNewPerson() {
    Person tempPerson = new Person();
    boolean okClicked = mainApp.showPersonEditDialog(tempPerson);
    if (okClicked) {
        mainApp.getPersonData().add(tempPerson);
    }
}

/**
 * Called when the user clicks the edit button. Opens a dialog to edit
 * details for the selected person.
 */
@FXML
private void handleEditPerson() {
    Person selectedPerson = personTable.getSelectionModel().getSelectedItem();
    if (selectedPerson != null) {
        boolean okClicked = mainApp.showPersonEditDialog(selectedPerson);
        if (okClicked) {
            showPersonDetails(selectedPerson);
        }

    } else {
        // Nothing selected.
        Alert alert = new Alert(AlertType.WARNING);
        alert.initOwner(mainApp.getPrimaryStage());
        alert.setTitle("No Selection");
        alert.setHeaderText("No Person Selected");
        alert.setContentText("Please select a person in the table.");

        alert.showAndWait();
    }
}
Open the PersonOverview.fxml file in Scene Builder. Choose the corresponding methods in On Action for the new and edit buttons.
Done!
You should have a working Address Application by now. The application is able to add, edit, and delete persons. There is even some validation for the text fields to avoid bad user entries.
I hope the concepts and structure of this application will get you started with writing your own JavaFX application! Have fun.
What’s Next?
In Tutorial Part 4 we will add some CSS styling.