第3部分的主题:
- 在表中反应选择的改变(TableView中)。
- 增加增加,编辑和删除按钮的功能。
- 创建自定义弹出对话框编辑人员。
- 验证用户输入。
响应表的选择
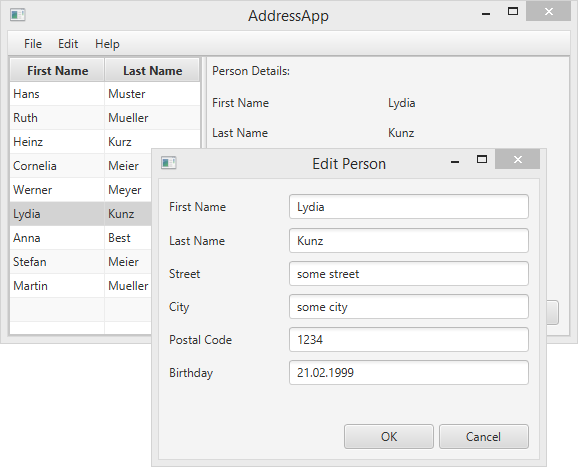
显然,我们还没有使用应用程序的右边。想法是当用户选择表中的人员时,在右边显示人员的详情。
首先,让我们在PersonOverviewController添加一个新的方法,帮助我们使用单个人员的数据填写标签。
创建方法showPersonDetails(Person person)。遍历所有标签,并且使用setText(…)方法设置标签的文本为个人的详情。如果null作为参数传递,所有的标签应该被清空。
PersonOverviewController.java
/**
 * Fills all text fields to show details about the person.
 * If the specified person is null, all text fields are cleared.
 *
 * @param person the person or null
 */
private void showPersonDetails(Person person) {
    if (person != null) {
        // Fill the labels with info from the person object.
        firstNameLabel.setText(person.getFirstName());
        lastNameLabel.setText(person.getLastName());
        streetLabel.setText(person.getStreet());
        postalCodeLabel.setText(Integer.toString(person.getPostalCode()));
        cityLabel.setText(person.getCity());

        // TODO: We need a way to convert the birthday into a String!
        // birthdayLabel.setText(...);
    } else {
        // Person is null, remove all the text.
        firstNameLabel.setText("");
        lastNameLabel.setText("");
        streetLabel.setText("");
        postalCodeLabel.setText("");
        cityLabel.setText("");
        birthdayLabel.setText("");
    }
}
转换生日日期为字符串
你注意到我们没有设置birthday到标签中,因为它是LocalDate类型,不是String。我们首先需要格式化日期。
在几个地方上我们使用LocalDate和String之间的转换。好的实践是创建一个带有static方法的帮助类。我们称它为DateUtil,并且把它放到单独的包中,称为ch.makery.address.util。
DateUtil.java
package ch.makery.address.util;

import java.time.LocalDate;
import java.time.format.DateTimeFormatter;
import java.time.format.DateTimeParseException;

/**
 * Helper functions for handling dates.
 *
 * @author Marco Jakob
 */
public class DateUtil {

	/** The date pattern that is used for conversion. Change as you wish. */
	private static final String DATE_PATTERN = "dd.MM.yyyy";

	/** The date formatter. */
	private static final DateTimeFormatter DATE_FORMATTER =
			DateTimeFormatter.ofPattern(DATE_PATTERN);

	/**
     * Returns the given date as a well formatted String. The above defined
     * {@link DateUtil#DATE_PATTERN} is used.
     *
     * @param date the date to be returned as a string
     * @return formatted string
     */
    public static String format(LocalDate date) {
        if (date == null) {
            return null;
        }
        return DATE_FORMATTER.format(date);
    }

    /**
     * Converts a String in the format of the defined {@link DateUtil#DATE_PATTERN}
     * to a {@link LocalDate} object.
     *
     * Returns null if the String could not be converted.
     *
     * @param dateString the date as String
     * @return the date object or null if it could not be converted
     */
    public static LocalDate parse(String dateString) {
        try {
        	return DATE_FORMATTER.parse(dateString, LocalDate::from);
        } catch (DateTimeParseException e) {
            return null;
        }
    }

    /**
     * Checks the String whether it is a valid date.
     *
     * @param dateString
     * @return true if the String is a valid date
     */
    public static boolean validDate(String dateString) {
    	// Try to parse the String.
    	return DateUtil.parse(dateString) != null;
    }
}
DATE_PATTERN修改日期的格式。所有可能的格式参考 DateTimeFormatter.
使用DateUtil
现在,我们需要在PersonOverviewController的showPersonDetails方法中使用我们新建的DateUtil。使用下面这样替代我们添加的TODO。
birthdayLabel.setText(DateUtil.format(person.getBirthday()));
监听表选择的改变
为了当用户在人员表中选择一个人时获得通知,我们需要监听改变。
在JavaFX中有一个接口称为ChangeListener,带有一个方法changed()。该方法有三个参数:observable, oldValue和newValue。
我们使用Java 8 lambda表达式创建这样一个ChangeListener。让我们添加一些行到PersonOverviewController的initialize()方法中。现在看起来是这样的。
PersonOverviewController.java
@FXML
private void initialize() {
    // Initialize the person table with the two columns.
    firstNameColumn.setCellValueFactory(
            cellData -> cellData.getValue().firstNameProperty());
    lastNameColumn.setCellValueFactory(
            cellData -> cellData.getValue().lastNameProperty());

    // Clear person details.
    showPersonDetails(null);

    // Listen for selection changes and show the person details when changed.
    personTable.getSelectionModel().selectedItemProperty().addListener(
            (observable, oldValue, newValue) -> showPersonDetails(newValue));
}
使用showPersonDetails(null),我们重设个人详情。
使用personTable.getSelectionModel...,我们获得人员表的selectedItemProperty,并且添加监听。不管什么时候用户选择表中的人员,都会执行我们的lambda表达式。我们获取新选择的人员,并且把它传递给showPersonDetails(...)方法。
现在试着运行你的应用程序,验证当你选择表中的人员时,关于该人员的详情是否正确的显示。
如果有些事情不能工作,你可以对比下PersonOverviewController.java中的PersonOverviewController类
删除按钮
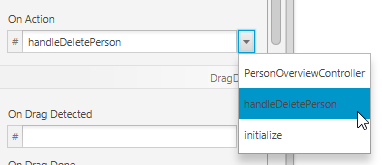
我们的用户接口已经包含一个删除按钮,但是没有任何功能。我们能在SceneBuilder中的按钮上选择动作。在我们控制器中的任何使用@FXML(或者它是公用的)注释的方法都可以被Scene Builder访问。因此,让我们在PersonOverviewController类的最后添加一个删除方法。
PersonOverviewController.java
/**
 * Called when the user clicks on the delete button.
 */
@FXML
private void handleDeletePerson() {
    int selectedIndex = personTable.getSelectionModel().getSelectedIndex();
    personTable.getItems().remove(selectedIndex);
}
现在,使用SceneBuilder打开PersonOverview.fxml文件,选择Delete按钮,打开Code组,在On Actin的下拉菜单中选择handleDeletePerson。
错误处理
如果你现在运行应用程序,你应该能够从表中删除选择的人员。但是,当你没有在表中选择人员时点击删除按钮时会发生什么呢。
这里有一个ArrayIndexOutOfBoundsException,因为它不能删除掉索引为-1人员项目。索引-1由getSelectedIndex()返回,它意味着你没有选择项目。
当然,忽略这种错误不是非常好。我们应该让用户知道在删除时必须选择一个人员。(更好的是我们应该禁用删除按钮,以便用户没有机会做错误的事情)。
我们添加一个弹出对话框通知用户,你将需要**添加一个库*Dialogs:
- 下载controlsfx-8.0.6_20.jar (你也能从ControlsFX Website中获取)。
重要:ControlsFX必须是8.0.6_20以上版本才能在
JDK8U20以上版本工作。 - 在项目中创建一个lib子目录,添加controlsf jar文件到该目录下。
- 添加库到你的项目classpath中。在Eclipse中右击jar文件|选择Build Path| Add to Build Path。现在Eclipse知道这个库了。

对handleDeletePerson()方法做一些修改后,不管什么时候用户没有选择表中的人员时按下删除按钮,我们能显示一个简单的对话框。
PersonOverviewController.java
/**
 * Called when the user clicks on the delete button.
 */
@FXML
private void handleDeletePerson() {
    int selectedIndex = personTable.getSelectionModel().getSelectedIndex();
    if (selectedIndex >= 0) {
        personTable.getItems().remove(selectedIndex);
    } else {
        // Nothing selected.
        Dialogs.create()
            .title("No Selection")
            .masthead("No Person Selected")
            .message("Please select a person in the table.")
            .showWarning();
    }
}
新建和编辑对话框
新建和编辑的动作有点工作:我们需要一个自定义带表单的对话框(例如:新的Stage),询问用户关于人员的详情。
设计对话框
-
在view包中创建新的fxml文件,称为
PersonEditDialog.fxml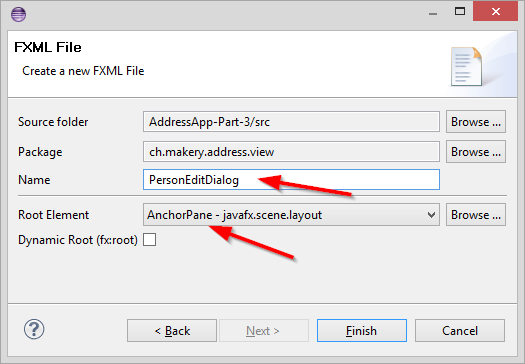
-
使用
GridPan,Label,TextField和Button创建一个对话框,如下所示:
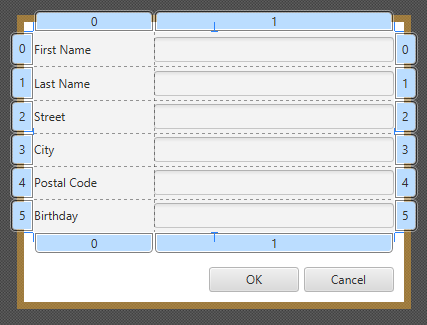
如果你不能完成工作,你能下载这个PersonEditDialog.fxml.
创建控制器
为对话框创建控制器PersonEditDialogController.java:
PersonEditDialogController.java
package ch.makery.address.view;

import javafx.fxml.FXML;
import javafx.scene.control.TextField;
import javafx.stage.Stage;

import org.controlsfx.dialog.Dialogs;

import ch.makery.address.model.Person;
import ch.makery.address.util.DateUtil;

/**
 * Dialog to edit details of a person.
 *
 * @author Marco Jakob
 */
public class PersonEditDialogController {

    @FXML
    private TextField firstNameField;
    @FXML
    private TextField lastNameField;
    @FXML
    private TextField streetField;
    @FXML
    private TextField postalCodeField;
    @FXML
    private TextField cityField;
    @FXML
    private TextField birthdayField;


    private Stage dialogStage;
    private Person person;
    private boolean okClicked = false;

    /**
     * Initializes the controller class. This method is automatically called
     * after the fxml file has been loaded.
     */
    @FXML
    private void initialize() {
    }

    /**
     * Sets the stage of this dialog.
     *
     * @param dialogStage
     */
    public void setDialogStage(Stage dialogStage) {
        this.dialogStage = dialogStage;
    }

    /**
     * Sets the person to be edited in the dialog.
     *
     * @param person
     */
    public void setPerson(Person person) {
        this.person = person;

        firstNameField.setText(person.getFirstName());
        lastNameField.setText(person.getLastName());
        streetField.setText(person.getStreet());
        postalCodeField.setText(Integer.toString(person.getPostalCode()));
        cityField.setText(person.getCity());
        birthdayField.setText(DateUtil.format(person.getBirthday()));
        birthdayField.setPromptText("dd.mm.yyyy");
    }

    /**
     * Returns true if the user clicked OK, false otherwise.
     *
     * @return
     */
    public boolean isOkClicked() {
        return okClicked;
    }

    /**
     * Called when the user clicks ok.
     */
    @FXML
    private void handleOk() {
        if (isInputValid()) {
            person.setFirstName(firstNameField.getText());
            person.setLastName(lastNameField.getText());
            person.setStreet(streetField.getText());
            person.setPostalCode(Integer.parseInt(postalCodeField.getText()));
            person.setCity(cityField.getText());
            person.setBirthday(DateUtil.parse(birthdayField.getText()));

            okClicked = true;
            dialogStage.close();
        }
    }

    /**
     * Called when the user clicks cancel.
     */
    @FXML
    private void handleCancel() {
        dialogStage.close();
    }

    /**
     * Validates the user input in the text fields.
     *
     * @return true if the input is valid
     */
    private boolean isInputValid() {
        String errorMessage = "";

        if (firstNameField.getText() == null || firstNameField.getText().length() == 0) {
            errorMessage += "No valid first name!\n";
        }
        if (lastNameField.getText() == null || lastNameField.getText().length() == 0) {
            errorMessage += "No valid last name!\n";
        }
        if (streetField.getText() == null || streetField.getText().length() == 0) {
            errorMessage += "No valid street!\n";
        }

        if (postalCodeField.getText() == null || postalCodeField.getText().length() == 0) {
            errorMessage += "No valid postal code!\n";
        } else {
            // try to parse the postal code into an int.
            try {
                Integer.parseInt(postalCodeField.getText());
            } catch (NumberFormatException e) {
                errorMessage += "No valid postal code (must be an integer)!\n";
            }
        }

        if (cityField.getText() == null || cityField.getText().length() == 0) {
            errorMessage += "No valid city!\n";
        }

        if (birthdayField.getText() == null || birthdayField.getText().length() == 0) {
            errorMessage += "No valid birthday!\n";
        } else {
            if (!DateUtil.validDate(birthdayField.getText())) {
                errorMessage += "No valid birthday. Use the format dd.mm.yyyy!\n";
            }
        }

        if (errorMessage.length() == 0) {
            return true;
        } else {
            // Show the error message.
        	Dialogs.create()
		        .title("Invalid Fields")
		        .masthead("Please correct invalid fields")
		        .message(errorMessage)
		        .showError();
            return false;
        }
    }
}
关于该控制器的一些事情应该注意:
setPerson(…)方法可以从其它类中调用,用来设置编辑的人员。- 当用户点击OK按钮时,调用
handleOK()方法。首先,通过调用isInputValid()方法做一些验证。只有验证成功,Person对象使用输入的数据填充。这些修改将直接应用到Person对象上,传递给setPerson(…)。 - 布尔值
okClicked被使用,以便调用者决定用户是否点击OK或者Cancel按钮。
连接视图和控制器
使用已经创建的视图(FXML)和控制器,需要连接到一起。
- 使用SceneBuilder打开
PersonEditDialog.fxml文件 - 在左边的Controller组中选择
PersonEditDialogController作为控制器类 - 设置所有TextField的
fx:id到相应的控制器字段上。 - 设置两个按钮的onAction到相应的处理方法上。
打开对话框
在MainApp中添加一个方法加载和显示编辑人员的对话框。
MainApp.java
/**
 * Opens a dialog to edit details for the specified person. If the user
 * clicks OK, the changes are saved into the provided person object and true
 * is returned.
 *
 * @param person the person object to be edited
 * @return true if the user clicked OK, false otherwise.
 */
public boolean showPersonEditDialog(Person person) {
    try {
        // Load the fxml file and create a new stage for the popup dialog.
        FXMLLoader loader = new FXMLLoader();
        loader.setLocation(MainApp.class.getResource("view/PersonEditDialog.fxml"));
        AnchorPane page = (AnchorPane) loader.load();

        // Create the dialog Stage.
        Stage dialogStage = new Stage();
        dialogStage.setTitle("Edit Person");
        dialogStage.initModality(Modality.WINDOW_MODAL);
        dialogStage.initOwner(primaryStage);
        Scene scene = new Scene(page);
        dialogStage.setScene(scene);

        // Set the person into the controller.
        PersonEditDialogController controller = loader.getController();
        controller.setDialogStage(dialogStage);
        controller.setPerson(person);

        // Show the dialog and wait until the user closes it
        dialogStage.showAndWait();

        return controller.isOkClicked();
    } catch (IOException e) {
        e.printStackTrace();
        return false;
    }
}
添加下面的方法到PersonOverviewController中。当用户按下New或Edit按钮时,这些方法将从MainApp中调用showPersonEditDialog(...)。
PersonOverviewController.java
/**
 * Called when the user clicks the new button. Opens a dialog to edit
 * details for a new person.
 */
@FXML
private void handleNewPerson() {
    Person tempPerson = new Person();
    boolean okClicked = mainApp.showPersonEditDialog(tempPerson);
    if (okClicked) {
        mainApp.getPersonData().add(tempPerson);
    }
}

/**
 * Called when the user clicks the edit button. Opens a dialog to edit
 * details for the selected person.
 */
@FXML
private void handleEditPerson() {
    Person selectedPerson = personTable.getSelectionModel().getSelectedItem();
    if (selectedPerson != null) {
        boolean okClicked = mainApp.showPersonEditDialog(selectedPerson);
        if (okClicked) {
            showPersonDetails(selectedPerson);
        }

    } else {
        // Nothing selected.
        Dialogs.create()
            .title("No Selection")
            .masthead("No Person Selected")
            .message("Please select a person in the table.")
            .showWarning();
    }
}
在Scene Builder中打开PersonOverview.fxml文件,为New和Edit按钮的On Action中选择对应的方法。
完成!
现在你应该有一个可以工作的Address应用。应用能够添加、编辑和删除人员。这里甚至有一些文本字段的验证避免坏的用户输入。
我希望本应用的概念和结构让开始编写自己的JavaFX应用!玩的开心。
下一步是什么?
在教程第4部分中将添加一些CSS样式表。