第二部分的主题
- 创建一个 模型 类。
- 在 ObservableList 使用模型类。
- 使用 Controllers 在 TableView 上显示数据。
创建 模型 类。
我们需要一个模型类来保存联系人信息到我们的通讯录中。在模型包中 (ch.makery.address.model) 添加一个叫 Person的类。Person 类将会有一些变量,名字,地址和生日。将以下代码添加到类。在代码后,我将解释一些 JavaFX 的细节。
Person.java
package ch.makery.address.model;

import java.time.LocalDate;

import javafx.beans.property.IntegerProperty;
import javafx.beans.property.ObjectProperty;
import javafx.beans.property.SimpleIntegerProperty;
import javafx.beans.property.SimpleObjectProperty;
import javafx.beans.property.SimpleStringProperty;
import javafx.beans.property.StringProperty;

/**
 * Model class for a Person.
 *
 * @author Marco Jakob
 */
public class Person {

	private final StringProperty firstName;
	private final StringProperty lastName;
	private final StringProperty street;
	private final IntegerProperty postalCode;
	private final StringProperty city;
	private final ObjectProperty<LocalDate> birthday;

	/**
	 * Default constructor.
	 */
	public Person() {
		this(null, null);
	}

	/**
	 * Constructor with some initial data.
	 *
	 * @param firstName
	 * @param lastName
	 */
	public Person(String firstName, String lastName) {
		this.firstName = new SimpleStringProperty(firstName);
		this.lastName = new SimpleStringProperty(lastName);

		// Some initial dummy data, just for convenient testing.
		this.street = new SimpleStringProperty("some street");
		this.postalCode = new SimpleIntegerProperty(1234);
		this.city = new SimpleStringProperty("some city");
		this.birthday = new SimpleObjectProperty<LocalDate>(LocalDate.of(1999, 2, 21));
	}

	public String getFirstName() {
		return firstName.get();
	}

	public void setFirstName(String firstName) {
		this.firstName.set(firstName);
	}

	public StringProperty firstNameProperty() {
		return firstName;
	}

	public String getLastName() {
		return lastName.get();
	}

	public void setLastName(String lastName) {
		this.lastName.set(lastName);
	}

	public StringProperty lastNameProperty() {
		return lastName;
	}

	public String getStreet() {
		return street.get();
	}

	public void setStreet(String street) {
		this.street.set(street);
	}

	public StringProperty streetProperty() {
		return street;
	}

	public int getPostalCode() {
		return postalCode.get();
	}

	public void setPostalCode(int postalCode) {
		this.postalCode.set(postalCode);
	}

	public IntegerProperty postalCodeProperty() {
		return postalCode;
	}

	public String getCity() {
		return city.get();
	}

	public void setCity(String city) {
		this.city.set(city);
	}

	public StringProperty cityProperty() {
		return city;
	}

	public LocalDate getBirthday() {
		return birthday.get();
	}

	public void setBirthday(LocalDate birthday) {
		this.birthday.set(birthday);
	}

	public ObjectProperty<LocalDate> birthdayProperty() {
		return birthday;
	}
}
解释
- 在JavaFX中,对一个模型类的所有属性使用
Properties是很常见的. 一个Property允许我们, 打个比方, 当lastName或其他属性被改变时自动收到通知, 这有助于我们保持视图与数据的同步,阅读 Using JavaFX Properties and Binding 学习更多关于Properties的内容。 birthday, 我们使用了LocalDate类型, 这在 Date and Time API for JDK 8 中是一个新的部分.
人员列表
我们的应用主要管理的数据是一群人的信息.让我们在 MainApp 类里面创建一个 Person 对象的列表。稍后其他所有的控制器类将存取 MainApp 的核心列表。
ObservableList
我们处理JavaFX的view classes需要在人员列表发生任何改变时都被通知. 这是很重要的,不然视图就会和数据不同步.为了达到这个目的,JavaFX引入了一些新的集合类.
在这些集合中, 我们需要的是ObservableList. 将以下代码增加到MainApp类的开头去创建一个新的ObservableList. 我们也会增加一个构造器去创建一些样本数据和一个公共的getter方法:
MainApp.java
    // ... AFTER THE OTHER VARIABLES ...

	/**
	 * The data as an observable list of Persons.
	 */
	private ObservableList<Person> personData = FXCollections.observableArrayList();

	/**
	 * Constructor
	 */
	public MainApp() {
		// Add some sample data
		personData.add(new Person("Hans", "Muster"));
		personData.add(new Person("Ruth", "Mueller"));
		personData.add(new Person("Heinz", "Kurz"));
		personData.add(new Person("Cornelia", "Meier"));
		personData.add(new Person("Werner", "Meyer"));
		personData.add(new Person("Lydia", "Kunz"));
		personData.add(new Person("Anna", "Best"));
		personData.add(new Person("Stefan", "Meier"));
		personData.add(new Person("Martin", "Mueller"));
	}

	/**
	 * Returns the data as an observable list of Persons.
	 * @return
	 */
	public ObservableList<Person> getPersonData() {
		return personData;
	}

    // ... THE REST OF THE CLASS ...
The PersonOverviewController
现在我们终于要将数据加入到表格中了,我们需要一个控制器为了PersonOverview.fxml,.
- 在view包下创建一个名为
PersonOverviewController.java的普通java类(我们需要将这个类放在和PersonOverview.fxml相同的包下, 不然SceneBuilder会找不到它 - 至少在当前的版本). - 我们需要增加一些实例变量来访问表格和在视图中的标签.这些属性和一些方法有一个特殊的
@FXML注解. 这对于fxml文件访问私有属性和私有方法来说是必需的. 当将一切都在fxml文件中设置好之后, 应用程序会在fxml文件被载入时自动地填充这些变量. 让我们添加以下的代码:
PersonOverviewController.java
package ch.makery.address.view;

import javafx.fxml.FXML;
import javafx.scene.control.Label;
import javafx.scene.control.TableColumn;
import javafx.scene.control.TableView;
import ch.makery.address.MainApp;
import ch.makery.address.model.Person;

public class PersonOverviewController {
    @FXML
    private TableView<Person> personTable;
    @FXML
    private TableColumn<Person, String> firstNameColumn;
    @FXML
    private TableColumn<Person, String> lastNameColumn;

    @FXML
    private Label firstNameLabel;
    @FXML
    private Label lastNameLabel;
    @FXML
    private Label streetLabel;
    @FXML
    private Label postalCodeLabel;
    @FXML
    private Label cityLabel;
    @FXML
    private Label birthdayLabel;

    // Reference to the main application.
    private MainApp mainApp;

    /**
     * The constructor.
     * The constructor is called before the initialize() method.
     */
    public PersonOverviewController() {
    }

    /**
     * Initializes the controller class. This method is automatically called
     * after the fxml file has been loaded.
     */
    @FXML
    private void initialize() {
    	// Initialize the person table with the two columns.
        firstNameColumn.setCellValueFactory(cellData -> cellData.getValue().firstNameProperty());
        lastNameColumn.setCellValueFactory(cellData -> cellData.getValue().lastNameProperty());
    }

    /**
     * Is called by the main application to give a reference back to itself.
     *
     * @param mainApp
     */
    public void setMainApp(MainApp mainApp) {
        this.mainApp = mainApp;

        // Add observable list data to the table
        personTable.setItems(mainApp.getPersonData());
    }
}
可能需要解释一下这段代码:
- 所有fxml文件需要访问的属性和方法必须加上
@FXML注解.实际上,只有在私有的情况下才需要, 但是让它们保持私有并且用注解标记的方式更好! initialize()方法在fxml文件完成载入时被自动调用. 那时, 所有的FXML属性都应已被初始化.- 我们在表格列上使用
setCellValueFactory(...)来确定为特定列使用Person对象的某个属性. 箭头->表示我们在使用Java 8的 Lambdas 特性. (另一个选择是使用 PropertyValueFactory, 但它不是类型安全的).
连接 MainApp 和 PersonOverviewController
setMainApp(...) 必须被 MainApp 类调用. 这让我们可以访问MainApp对象并得到Persons的列表和其他东西. 用以下代码替换showPersonOverview() 方法. 它包含了新增的两行:
MainApp.java - new showPersonOverview() method
/**
 * Shows the person overview inside the root layout.
 */
public void showPersonOverview() {
    try {
        // Load person overview.
        FXMLLoader loader = new FXMLLoader();
        loader.setLocation(MainApp.class.getResource("view/PersonOverview.fxml"));
        AnchorPane personOverview = (AnchorPane) loader.load();

        // Set person overview into the center of root layout.
        rootLayout.setCenter(personOverview);

        // Give the controller access to the main app.
        PersonOverviewController controller = loader.getController();
        controller.setMainApp(this);

    } catch (IOException e) {
        e.printStackTrace();
    }
}
将View与Controller挂钩
我们快要完成了! 但是有件小事被遗漏了: 至今没有告诉 PersonOverview.fxml使用的是哪个控制器以及元素与控制器中的属性的对应关系.
-
使用SceneBuilder 打开
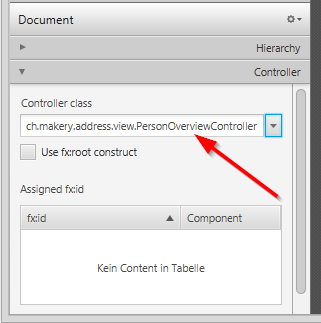
PersonOverview.fxml. -
打开左边的 Controller 组选择
PersonOverviewController作为 controller class.
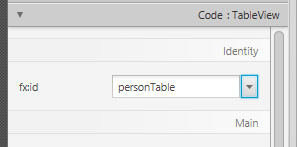
-
在 Hierarchy 组选择
TableView并选择 Code 组将personTable作为 fx:id.
-
对列做相同的事并且将
firstNameColumnandlastNameColumn分别作为 fx:id . -
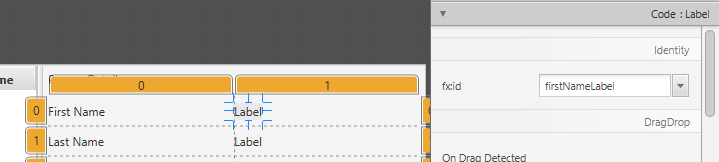
对在第二列的 each label , 选择对应的 fx:id.
-
重要事项: 回到eclipse并且 refresh the entire AddressApp project (F5). 这是必要的因为有时候eclipse并不知道在Scene Builder中作出的改变.
启动应用程序
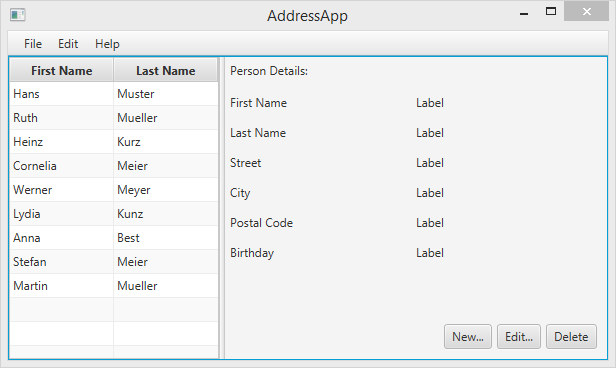
当你现在启动了你的应用,你应该看到了类似这篇博客开头的截图的程序界面.
恭喜!
接下去做什么?
在 Tutorial Part 3 我们将加入增加,删除和编辑人员的功能.