Very often in JavaFX we have to react to user events: The user clicks a button, presses a key, moves the mouse, etc. This post describes how to handle such events.
We’ll try to do as much event handling with Scene Builder and fxml as possible. For some events we’ll add event handling in the Java code of the controller.
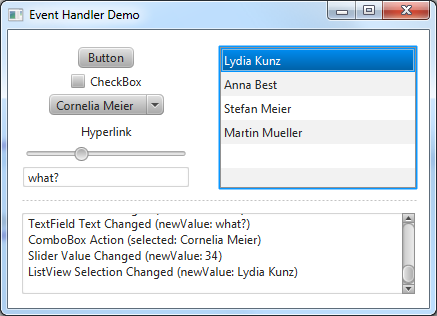
Our example covers some of the most used events on common JavaFX 2 controls:
Note: For background information refer to the official JavaFX Events Tutorial (does not cover fxml).
Set Up
Set up a simple JavaFX project with an fxml file, a corresponding controller class and a main class to load the fxml. Alternatively, just download the source at the end of this post.
Button Events
Handling Button events is very easy. Altough there are other events we’ll likely only need ActionEvents.
First, open the controller class. Add a new method to handle button action events:
@FXML
private void handleButtonAction() {
  outputTextArea.appendText("Button Action\n");
}
Note: The outputTextArea is just a JavaFX TextArea to print some output. You could also do a System.out.println(...).
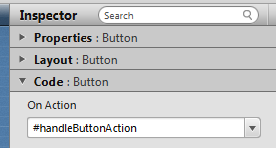
Now, open the fxml file in Scene Builder, select a button and choose #handleButtonAction as On Action.
This should already be enough for the button to work. If we need more information about the event that called our method in the controller, we could add a parameter like this:
@FXML
private void handleButtonAction(ActionEvent event) {
  outputTextArea.appendText(event.toString() + "\n");
}
CheckBox Events
Handling CheckBox events works almost the same as handling Button events. The only difference is that we might need to know the current state of the CheckBox, wheter it is selected or not.
For such information we must have a reference to the CheckBox. So, we’ll add an instance variable at the beginning of our controller.
@FXML
private CheckBox checkBox;
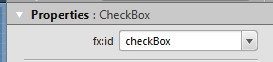
Open Scene Builder, choose the checkBox variable as fx:id for the CheckBox.
Now create a handler method and choose it as On Action in Scene Builder.
@FXML
private void handleCheckBoxAction() {
  outputTextArea.appendText("CheckBox Action (selected: " + checkBox.isSelected() + ")\n");
}
ComboBox Events
For the ComboBox (and later for the ListView) we’ll use a simple model class called Person with a firstName and lastName attribute:
Person.java
public class Person {
	private String firstName;
	private String lastName;

	public Person(String firstName, String lastName) {
		this.firstName = firstName;
		this.lastName = lastName;
	}

	@Override
	public String toString() {
		return firstName + " " + lastName;
	}
}
Now, let’s start with the ComboBox stuff:
First, create an instance variable for the ComboBox and an ObservableList in our controller class. Select the comboBox variable as fx:id in Scene Builder:
@FXML
private ComboBox<Person> comboBox;

private ObservableList<Person> comboBoxData = FXCollections.observableArrayList();
Second, add some data (e.g. in the constructor or initialize method):
comboBoxData.add(new Person("Hans", "Muster"));
comboBoxData.add(new Person("Ruth", "Mueller"));
comboBoxData.add(new Person("Heinz", "Kurz"));
comboBoxData.add(new Person("Cornelia", "Meier"));
Third, set the data into the list. This must be in the initialize() method as this is the time when we can be shure that the variable comboBox is initialized with the ComboBox from the fxml file.
comboBox.setItems(comboBoxData);
Fourth, create a handler method and select the method as On Action in Scene Builder.
@FXML
private void handleComboBoxAction() {
  Person selectedPerson = comboBox.getSelectionModel().getSelectedItem();
  outputTextArea.appendText("ComboBox Action (selected: " + selectedPerson + ")\n");
}
Hyperlink Events
Hyperlinks can be used the same way as a Button (see above).
@FXML
private void handleHyperlinkAction() {
	outputTextArea.appendText("Hyperlink Action\n");
}
Slider Events
Sliders don’t have ActionEvents. Instead they have a Number called valueProperty that contains the current value of the slider.
Change Listener
In JavaFX a Property is more than just a simple value. Each Property provides methods to observe changes made to its value. We can “listen for changes”.
So, create an instance variable and select it fx:id in Scene Builder:
@FXML
private Slider slider;
In the initialize() method add a ChangeListener:
// Listen for Slider value changes
slider.valueProperty().addListener(new ChangeListener<Number>() {
	@Override
	public void changed(ObservableValue<? extends Number> observable,
			Number oldValue, Number newValue) {

		outputTextArea.appendText("Slider Value Changed (newValue: " + newValue.intValue() + ")\n");
	}
});
This construct looks a bit coplicated. Fortunately, it’s always the same pattern for every ChangeListener. Let me explain:
slider.valueProperty()gives us access to theProperty.
Note: There are many otherPropertieslikefocusedProperty() ordisabledProperty(). We could use any of those properties and add aChangeListener` to it.addListener(...)expects aChangeListenerof typeNumber.ChangeListeneris an interface so we need to create a concrete class thatimplements ChangeListener:
- Normally, we would create a new class implementing the
ChangeListenerinterface like this:public class MyChangeListener implements ChangeListener<Number> {...}. Then, we’d create an instance of this class and pass it toaddListener(...). - Since we will use this class only once, it’s a bit overkill to create a normal class. Instead we can use a short form of creating a class and instantiating it. This is called an Anonymous Inner Class as it does not have a name.
new ChangeListener<Number>() {...}creates such an Anonymous Inner Class of type<Number>.- Every
ChangeListenermust have a method calledchanged(...)that will be called every time a change occurs.
TextBox Events
In a TextBox the ActionEvent is triggered with the return key. We might use this, but probably the most common case is that we must react to changes made to the text.
First, we’ll create an instance variable and select it as fx:id in Scene Builder:
@FXML
private TextField textField;
And this is how we can react to changes of the text. We’ll use a ChangeListener as described above (see Slider section):
// Listen for TextField text changes
textField.textProperty().addListener(new ChangeListener<String>() {
	@Override
	public void changed(ObservableValue<? extends String> observable,
			String oldValue, String newValue) {

		outputTextArea.appendText("TextField Text Changed (newValue: " + newValue + ")\n");
	}
});
ListView Events
We’ll use the same Person class as we used for the ComboBox above.
First, create an instance variable for the ListView and an ObservableList in our controller class. Select the listView variable as fx:id in Scene Builder:
@FXML
private ListView<Person> listView;

private ObservableList<Person> listViewData = FXCollections.observableArrayList();
Second, add some data (e.g. in the constructor or initialize method):
listViewData.add(new Person("Lydia", "Kunz"));
listViewData.add(new Person("Anna", "Best"));
listViewData.add(new Person("Stefan", "Meier"));
listViewData.add(new Person("Martin", "Mueller"));
Third, set the data into the list. This must be in the initialize() method as this is the time when we can be shure that the variable listView is initialized with the ListView from the fxml file.
listView.setItems(listViewData);
Fourth, also in the initialize() method, we’ll add a ChangeListener. It is the same ChangeListener pattern as described above (see Slider section):
listView.getSelectionModel().selectedItemProperty().addListener(new ChangeListener<Person>() {
	@Override
	public void changed(ObservableValue<? extends Person> observable,
			Person oldValue, Person newValue) {

		outputTextArea.appendText("ListView Selection Changed (newValue: " + newValue + ")\n");
	}
});
Download Example Source
Download the complete event-handlers example source.